
Photo by Sasun Bughdaryan on Unsplash
Microsoft Features: Microsoft Purview Data Loss Prevention
Estimated Reading Time: 6 minutes
In my previous blog, I wrote about the Microsoft Purview Data Loss Prevention Deployment Approach that organizations should be taking to support a successful Purview DLP deployment.
In this blog, we’ll be discussing deploying Purview DLP for Microsoft 365 workloads, including common deployment use cases, policy configuration, and some limitations to be aware of.
For those interested, here are the links to the other blogs in my Data Loss Prevention blog series (links will become available as blogs are published):
- An Introduction to Microsoft Purview Data Loss Prevention
- Deploying Microsoft Purview Data Loss Prevention
- Deploying Purview Data Loss Prevention for Microsoft 365
What is Microsoft 365 Data Loss Prevention?
Microsoft 365 Data Loss Prevention refers to Purview DLP focusing on Microsoft 365 workloads including SharePoint Online, OneDrive for Business, Teams, and Exchange Online. This does not include locations such as on-premises repositories, non-Microsoft cloud applications, and endpoints.
For example, Microsoft 365 DLP can be used to monitor, warn, and block users from sharing sensitive data in SharePoint Online with external users. As with all types of Purview DLP, Microsoft 365 DLP provides countless options for tailoring policy conditions and actions to the use cases desired by organizations.
Common Use Cases for Microsoft 365 Data Loss Prevention
Although the specific DLP policies desired by organizations highly depend on industry-specific regulations, company policies, the sensitive data that is handled, and many other factors, below are some common use cases for DLP policies from which many organizations can benefit.
1. Monitor and control sensitive data sharing with external users
Organizations will often have specific data types not approved for sharing with users external to the organization (e.g., employee files). It is also possible that the organization’s information classification schema prohibits such sharing scenarios (e.g., Top Secret files).
2. Monitor and control sensitive data stored in OneDrive
Business units, departments, and teams dealing with sensitive data will often have approved storage locations. OneDrive is designed for personal file storage and should often not be used for storing sensitive corporate data.
3. Monitor and control sensitive data shared in Teams chats and channel messages
Similarly, business units, departments, and teams dealing with sensitive data will often have approved sharing mechanisms. Microsoft Teams is designed for transitory conversations and should typically not be used for sharing sensitive data.
Policy Configuration Example
Let’s consider the first common use case above, “Monitor and control sensitive data sharing with external users”. Let’s say that an organization is particularly concerned about ensuring that files and emails containing a full name along with a Canadian social insurance number are not shared with external users.
Below is how an administrator would configure a DLP policy to address this use case:
1. Navigate to https://purview.microsoft.com.
2. Ensure that you are assigned the required permissions to configure Purview DLP policies (reference: https://learn.microsoft.com/en-us/purview/dlp-create-deploy-policy#permissions).
3. Navigate to Solutions > Data Loss Prevention > Policies and click on + Create policy.
4. On the “Choose what type of data to protect” page, select Enterprise applications & devices.
5. On the “Start with a template or create a custom policy” page, select Custom > Custom policy.
6. On the “Name your DLP policy” page, provide a Name and Description for the policy.
7. On the “Assign admin units” page, if applicable, configure administrative units to scope the policy to.
8. On the “Choose where to apply the policy” page, select Exchange email, SharePoint sites and OneDrive accounts.
- If applicable, you can further scope the policy to specific groups, sites, and users within these locations.

9. On the “Define policy settings” page, select Create or customize advanced DLP rules.
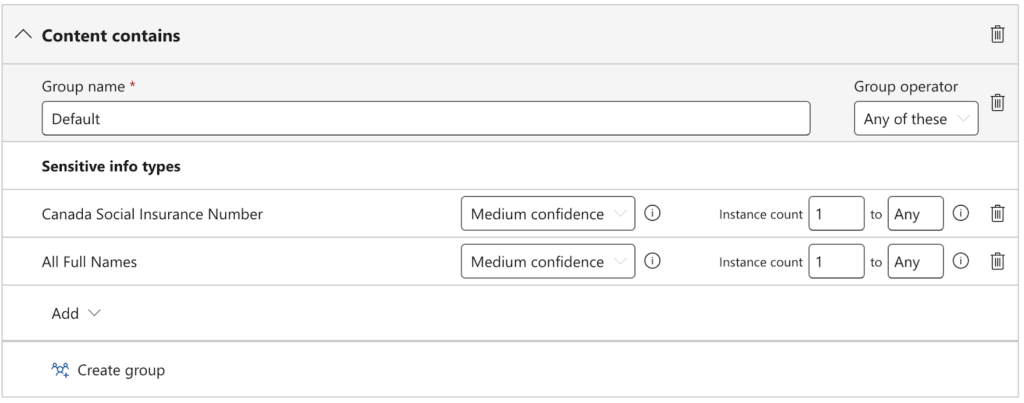
10. Create a rule with the following settings:
- Name: Block external sharing of name + SIN (or name as desired)
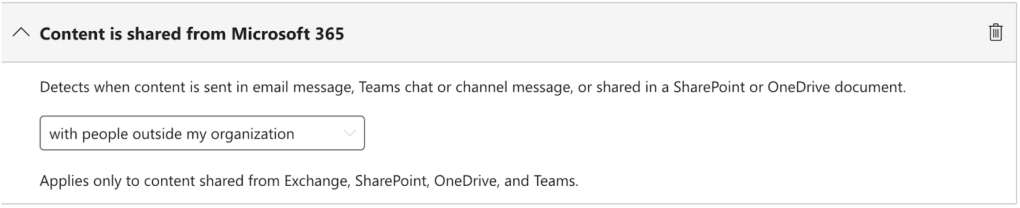
- Conditions: Content contains > Sensitive info types > Canada Social Insurance Number + All full names AND Content is shared from Microsoft 365 with people outside my organization
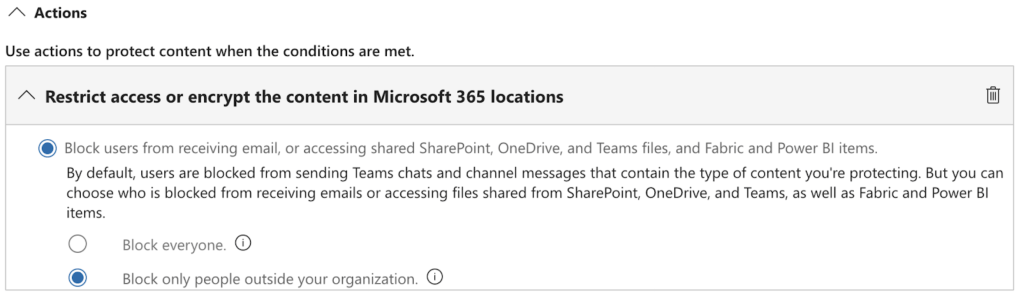
- Actions: Restrict access or encrypt the content in Microsoft 365 locations > Block only people outside your organization
- User notifications & user overrides: Off
- Incident reports:
- Send an alert to admins when a rule match occurs: On
11. On the “Policy mode” page, select Turn the policy on immediately.
After configuring the above DLP policy, it will be published and begin blocking users in approximately 24 – 48 hours.
Please note that it is important to take a phased approach to deploying DLP policies. For more information, refer to the previous blog in the series: Deploying Microsoft Purview Data Loss Prevention.
Some Limitations to be Aware of
There are well-documented limitations/constraints around Purview DLP policies that you can check out here: https://learn.microsoft.com/en-us/purview/dlp-policy-reference#before-you-begin.
However, 3 limitations that I would like to highlight for your awareness include:
- DLP rule names must be unique across all DLP policies and rules.
- When leveraging the Content contains > Sensitive information types policy condition, the confidence levels selected by the administrator must be defined for the SIT.
- It is important to review built-in and custom SIT definitions prior to configuring DLP policies!
- DLP policies scoped to Exchange Online will not scan and apply to emails at rest.
Something else to mention is that the options you see within the DLP rule will be the intersection of all the rule options available for the locations that you select. This means that if you want to configure a DLP policy that evaluates based on an Exchange-specific condition, for example, you will have to create a single, dedicated DLP policy for this use case with the only location selected being Exchange. The same applies for workload-specific actions.
Closing Thoughts
Deploying Microsoft 365 DLP is a critical step in ensuring that sensitive data remains protected across collaboration platforms where users work every day. By thoughtfully designing policies around real business needs and understanding key limitations, organizations can strike the right balance between enabling productivity and maintaining strong data protection.
