
Microsoft Features: Microsoft Purview Information Protection
Estimated Read Times: 6 minutes
In my previous two blogs, I wrote about How Purview Sensitivity Labels Help Protect Your Data and How to Configure Purview Sensitivity Labels to Protect Your Data. However, up to this point, one critical component is missing: applying the labels to content! In this blog I’ll provide an overview of the different ways that sensitivity labels can be applied to protect your content in Microsoft 365.
Please note that in this blog, I will be focusing on methods and locations to apply sensitivity labels for files & emails only.
Applying Sensitivity Labels in Microsoft 365 Apps and Services
Sensitivity labels can be applied to content across Microsoft 365 apps and services (e.g., SharePoint Online, Exchange Online, OneDrive for Business). The methods available to apply sensitivity labels to content in these locations include:
- Manual labeling
- Default labeling (including document library-level defaults)
- Client-side auto-labeling
- Service-side auto-labeling
Manual label application refers to an end user selecting and applying the appropriate sensitivity label based on their evaluation of the sensitivity of the information within the file or email.
Default label application refers to a particular sensitivity label that is applied to content by default, without the system evaluating the sensitivity of the information within the file or email. Default sensitivity labels can be configured in several ways (e.g., a default label specified in a publishing policy for all files / emails, a default label specified in a SharePoint document library for all documents within the library, etc.).
Automatic label application refers to when a particular sensitivity label is applied to content automatically only when a predefined set of conditions for the file or email are met (e.g., the file contains a social insurance number and full name). Similarly, automatic application of sensitivity labels can be implemented in several ways (e.g., client-side auto labeling, service-side auto-labeling, etc.).
In the following sections, I’ll dive deeper into the different methods to apply sensitivity labels in Microsoft 365 apps and services.
Manual Labeling
To make sensitivity labels available to your end users for manual application, navigate to Policies > Publishing policies in the Purview portal (https://purview.microsoft.com/informationprotection/labelpolicies) and click on Publish label to configure the policy. After configuring the policy, you should expect your end users to start seeing the published sensitivity labels in approximately 24 hours.

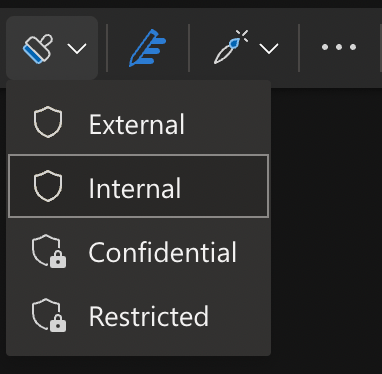
The above screenshot shows the end user experience in a Word document opened in Office for the Web, manually applying the Internal sensitivity label.
Default Labeling
To specify a default sensitivity label for content, navigate to Policies > Publishing policies in the Purview portal (https://purview.microsoft.com/informationprotection/labelpolicies) and click on Publish label to configure the policy. When configuring the policy, ensure to specify the default sensitivity label for documents and emails. After configuring the policy, you should expect that the default sensitivity label will be applied to unlabeled content that is newly created or modified.
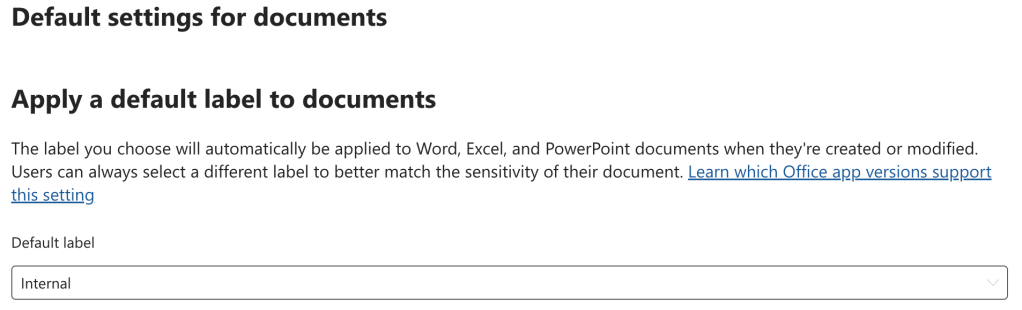
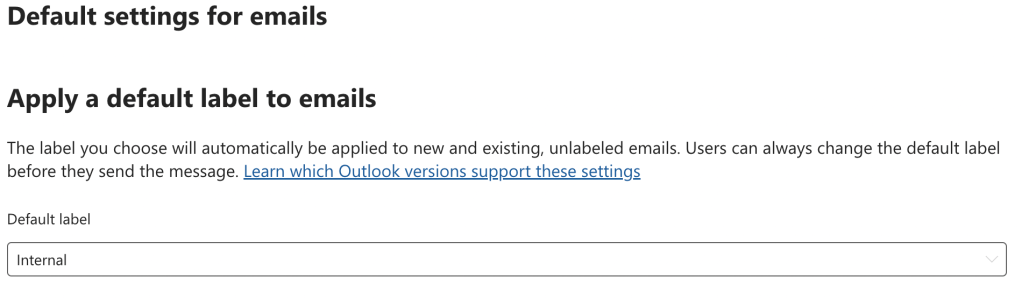
To avoid user experience issues (e.g., long document loading times), do not specify an encrypting label as the default.
Default Labeling in SharePoint Document Libraries
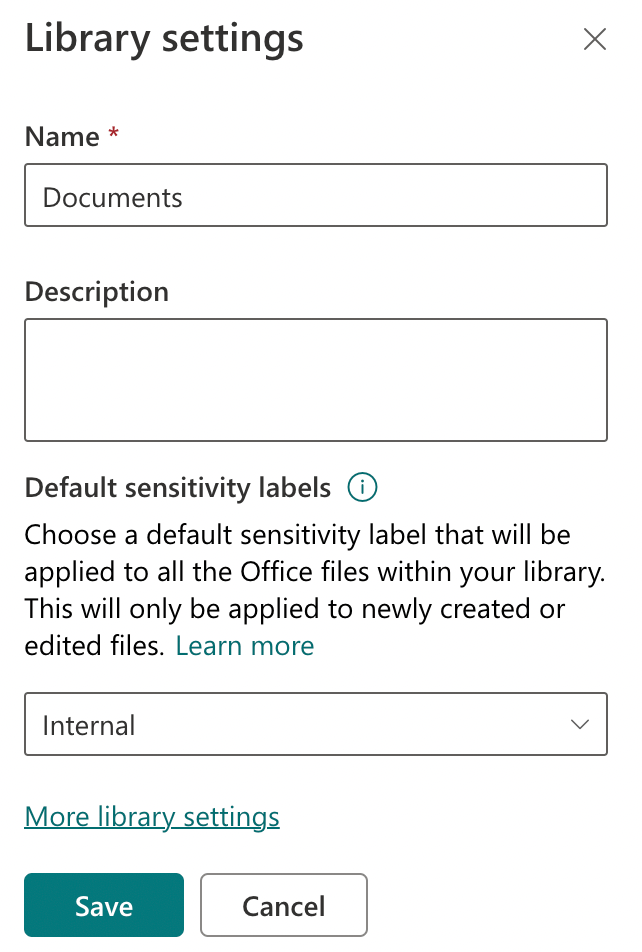
Furthermore, default sensitivity labels can be specified at the document library-level in SharePoint Online. To specify a default sensitivity label for a particular document library, navigate to Settings > Library settings and select the desired sensitivity label from the drop down under Default sensitivity labels.
After this is configured, the sensitivity label will be applied to new or modified documents that are either unlabeled or have a system-applied label of lower priority. For example, let’s say that a sensitivity label “General” (priority = 1) was specified as the default label for all documents in the publishing policy. Assuming that the document library-level default sensitivity label is “Confidential” (priority = 2), then the Confidential label will be applied to the document if it is uploaded to the document library.
On the other hand, if the end user manually applied the General label to the document, or the document has the sensitivity label “Restricted” (priority = 3) applied, and the document is uploaded to the document library, the General label would remain applied.
To better understand when the document library-level default label is applied, feel free to refer to the following Microsoft Learn documentation: Will an existing label be overwritten?
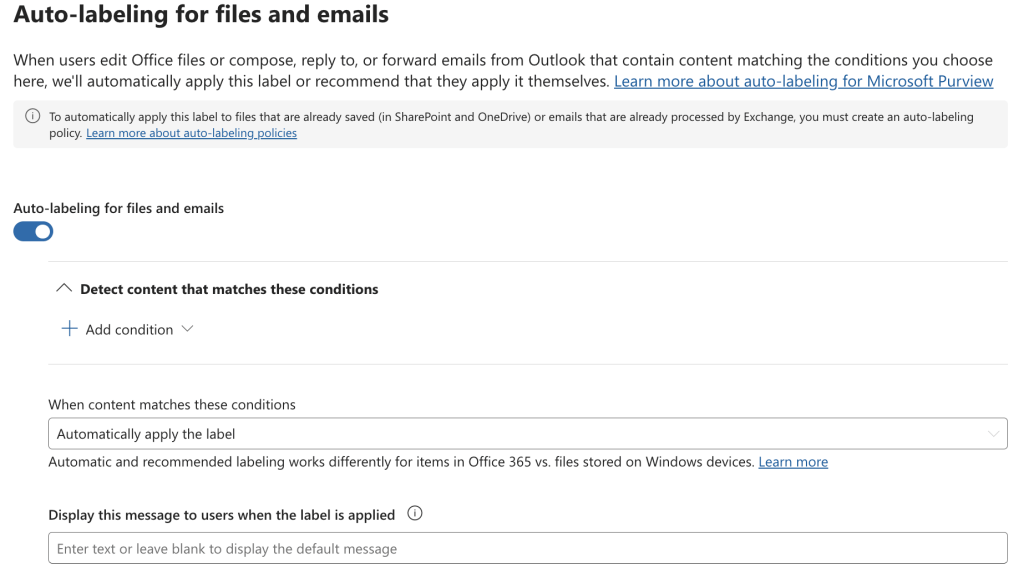
Client-Side Auto-Labeling
I like to think of client-side auto-labeling as automatic labeling of content with which the end user can interact. This type of auto-labeling is driven by the Word, Excel, PowerPoint, and Outlook client applications (hence the name), and therefore, requires specified minimum versions of Office apps.
To configure client-side auto-labeling for a specific sensitivity label, navigate to Sensitivity labels in the Purview portal (https://purview.microsoft.com/informationprotection/informationprotectionlabels/sensitivitylabels) and create / edit a sensitivity label. On the Auto-labeling for files and emails configuration screen, specify the conditions for auto-labeling (e.g., content contains a credit card number), the action to take when these conditions are met (either recommend that the user apply the label or automatically apply the label), and customize the message that is displayed to users when the label is applied (optional).
The screenshot below provides an example of the end user experience for the “recommend a label” functionality in Microsoft Word.

Service-Side Auto-Labeling
On the other hand, service-side auto-labeling is automatic labeling of data at rest (not including emails at rest in Exchange) without end user interaction. This type of auto-labeling is not driven by client applications, and therefore, is available across the organization regardless of the versions of Office apps in use.
To configure service-side auto-labeling, navigate to Policies > Auto-labeling policies in the Purview portal (https://purview.microsoft.com/informationprotection/autolabeling) and click on + Create auto-labeling policy. Select the sensitivity label to be applied, the in-scope repositories, and configure the conditions to be evaluated. Finally, test the policy in simulation mode and turn it on only when you are confident that the conditions are sufficient to ensure accurate label application.

Please note that the specified daily tenant limit for the number of documents that sensitivity labels can be automatically applied to is currently 100,000.
Closing Thoughts
As you can see, there are several ways that sensitivity labels can be applied to content in Microsoft 365 apps and services, including manual, default, and automatic labeling. In my next blog, I’ll dive deeper into how sensitivity labels can be applied to content in cloud applications and on-premises repositories. Stay tuned!
